A Detailed Guide of YOLO on OpenCV Python
Introduction
When I was undergoing internship in Weeview, it was the first I heard OpenCV. With the help of OpenCV, I wrote the code of barrel distortion, camera calibration, and video pip program. (you can see here, here, and here on my GitHub) Though I spent some time on how to mastering it and even being “notice” that I was totally not on schedule by my menter (such embarrassing …), I eventually learned how to use OpenCV and felt how powerful it is. You can integrate OpenCV to your existing C++ project with its noticeable function with fast processing speed. What’s more, by glancing its source code, you can realize both theories of each image processing method and the implementation.
As time passes, OpenCV comes with plenty of features, and there
is no exception with deep learning. Begin from version 3.4, OpenCV
gradually adds the features of deep learning inference. However, it
still doesn’t provide training a deep learning model via its API called DNN.
So usually creating a deep learning model with OpenCV will exists
the following workflow:
load trained model with OpenCV readNet-like function ->
make prediction
YOLO is a well-known object detection neural network architecture,
and I am quite impressed pjreddie can code such network with C and
his will. Nevertheless, we convert the weight file commonly in
practice because our boss says we have to use certain programming
language. In addition, I have heard that when inferencing YOLO
using OpenCV DNN module is much faster than using pjreddie or AlexeyAB’s verions (see here),
especially on CPU. Summing up, I write this article as a record
of inferencing YOLO using OpenCV DNN model and make an experiment
of inferencing time comparison between pjreddic, AlexeyAB, and OpenCV.
Goal of This Article
In this article, I am going to:
- Make an example of fish YOLO object detection on OpenCV (you can copy and paste my code at will on your custom object detection work).
- Make an execution time experiment between pjreddid, AlexeyAB, and OpenCV YOLO inference.
Prepare
- Clone my repo from here.
- Download the pretrained weights from my Google Drive and put it to
yolo-fishdirectory. - Create
condavirtual environment and install the dependencies:$ conda create -n fish-opencv-yolo-python python=3.6 pip $ conda activate fish-opencv-yolo-python $ pip install -r requirements.txt - Activate the virtual environment.
- Run prediction of
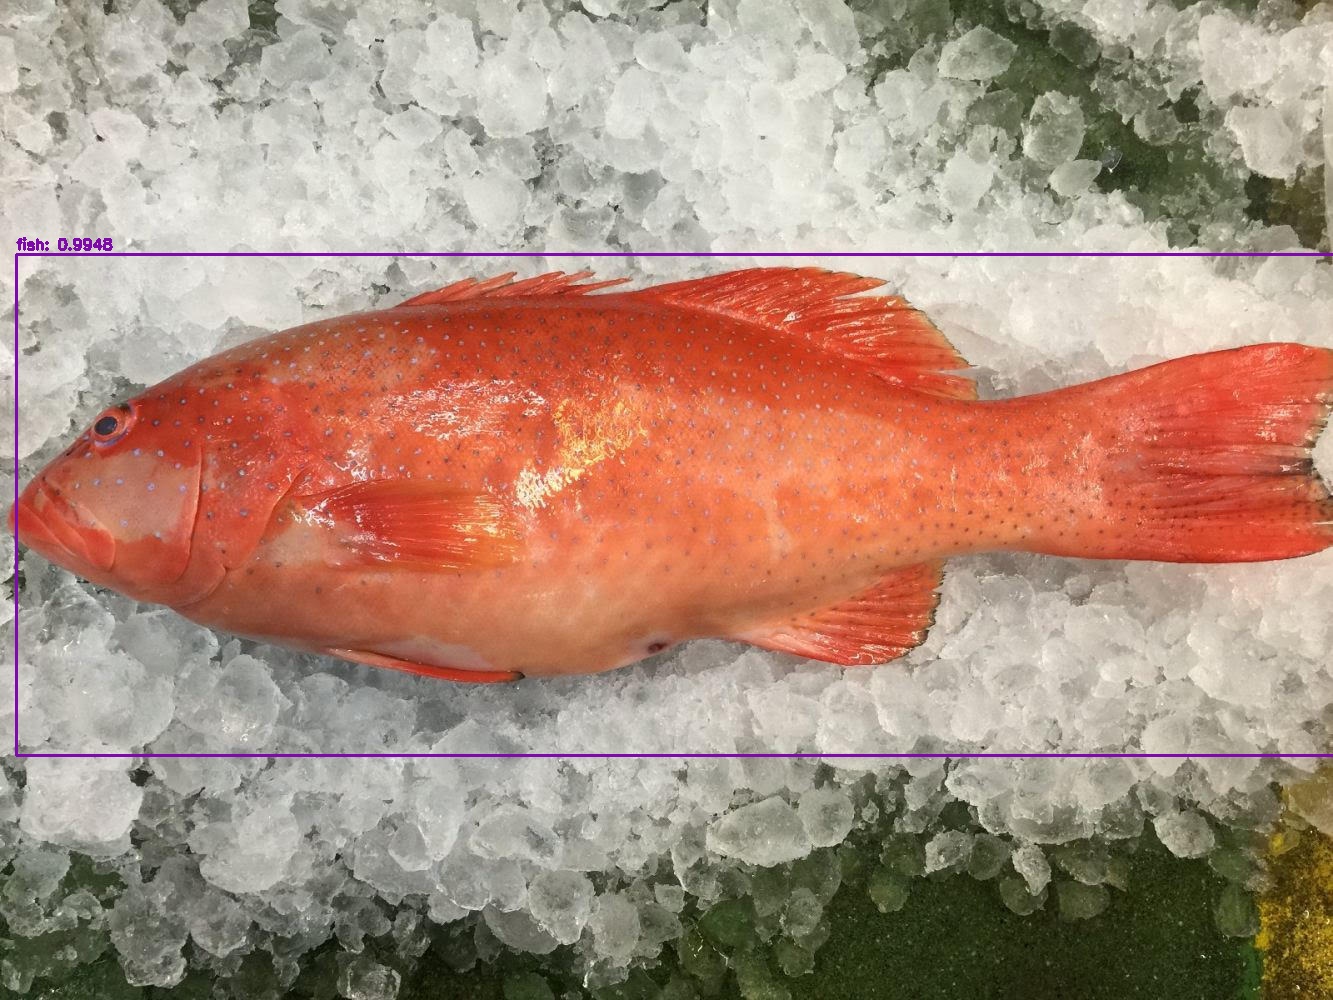
七星斑.jpgwith this command:$ python yolo.py --image ./images/七星斑.jpg --yolo yolo-fish
You should get a pop-up window if there is no any problem:
Explanations
Of course, you would like to know how to use OpenCV for YOLO object detection. In this section, I will write the keypoints one-by-one.
read weights
OpenCV provides a lot of readNet-like functions for ease of reading weights trained by other frameworks.
In version 4.1.1, OpenCV supports the following frameworks’ format:
- Caffe
- TensorFlow
- Torch
- Darknet
- DLDT (OpenVINO)
- ONNX
I am going to use my pre-trained model of Darknet, so choose readNetFromDarknet() to read Darknet weights.
create blob (tensor)
In DNN module of OpenCV, it requires your input transform to a blob, or tensor in other neural network
framework. To create a blob, I use blobFromImage() function to create a 4-dimentional blob shown below:
blob = cv.dnn.blobFromImage(image, 1 / 255.0, (416, 416), swapRB=True, crop=False)
Specifically, some parameters of blobFromImage are described below:
scalefactor: it multiplies each pixels of image with its value. I set1 / 255.0here because I would like to get a blob withCV_32Ftype (ornumpy.float32in Python).size: resize the image to certain size. Here I set(416, 416)because YOLO wants to receive this size.- Though my YOLO network was trained with size of
(608, 608), I set above value because(608, 608)will work improperly on OpenCV. See Trivia part for more description.
- Though my YOLO network was trained with size of
swapRB=True: OpenCV saves colored image toBGRrather thanRGBformat, while YOLO wants to receivesRGBformat picture. Therefore, I setTruefor this purpose.crop: to crop image after image is resized. I don’t want to crop the image, so I set this toFalse.
After this operation, we get a 4-D blob with NCHW format.
perform a forward pass through YOLO network
Before I make a forward pass, I have to determine the output layer names from my YOLO model by these means:
ln = net.getLayerNames()
ln = [ln[i[0] - 1] for i in net.getUnconnectedOutLayers()]
After that, I am able to make a forward pass:
net.setInput(blob)
start = time.time()
layerOutputs = net.forward(ln)
end = time.time()

# show execution time information of YOLO
print("[INFO] YOLO took {:.6f} seconds.".format(end - start))
non-maxima supression
For object detection, we usually use non-maxima supression to choose the bounding box that is the most suitable for marking the location of a detected object. While YOLO doesn’t do that, we can in turn craft a non-maxima supression instead:
    idxs = cv.dnn.NMSBoxes(boxes, confidences, args["confidence"],
        args["threshold"])
What you have to do is just submit bounding boxes (box), confidences, (confidences), confidence
threshold, and NMS threshold.
Inferencing time Comparison
In introduction section I have mentioned YOLO object detection runs much faster than darknet written by pjreddie and AlexeyAB. Therefore, I would like to make an experiment to show you this fact is true.
Specification
The hardware specification is listed below:
- CPU: Core i5-3230M
- RAM: 16GB
And I list the software specification here:
- OS: CentOS 7.6
- OpenCV
- version: 4.1.1
- donloaded from
pip
- pjreddie’s darknet
- compiled without OpenMP
- compiled with OpenMP
- AlexeyAB’s darknet
- compiled without OpenMP and AVX
- compiled with OpenMP
- compiled with AVX
- I don’t test this because the compiled program gives me a seg fault.
You can find pjreddie and AlexeyAB’s work in the following link:
pjreddie: https://github.com/pjreddie/darknet
AlexeyAB: https://github.com/AlexeyAB/darknet
Some controlled variables are show here:
- Input image: 七星斑.jpg
- Input dimension of YOLO: 608 x 608
- confidence: 0.25
- threshold: 0.4
I make a comparison time table in the following:
| execution time (second) | |
|---|---|
| Darknet (pjreddie) without OpenMP | 35.99 |
| Darknet (pjreddic) with OpenMP | 21.68 |
| Darknet (AlexeyAB) without OpenMP | 33.15 |
| Darknet (AlexeyAB) with OpenMP | 24.37 |
| Darknet (OpenCV) | 2.95 |
You can find Darknet running on OpenCV runs the fastest.
Conclusion
In this article, I demonstrate how to do custom data YOLO object detection with OpenCV via an example of fish object image. I also show some outlines when using YOLO object detection with OpenCV. Finally, I made a inferencing time comparison and show the OpenCV version runs the fastest.
Trivia
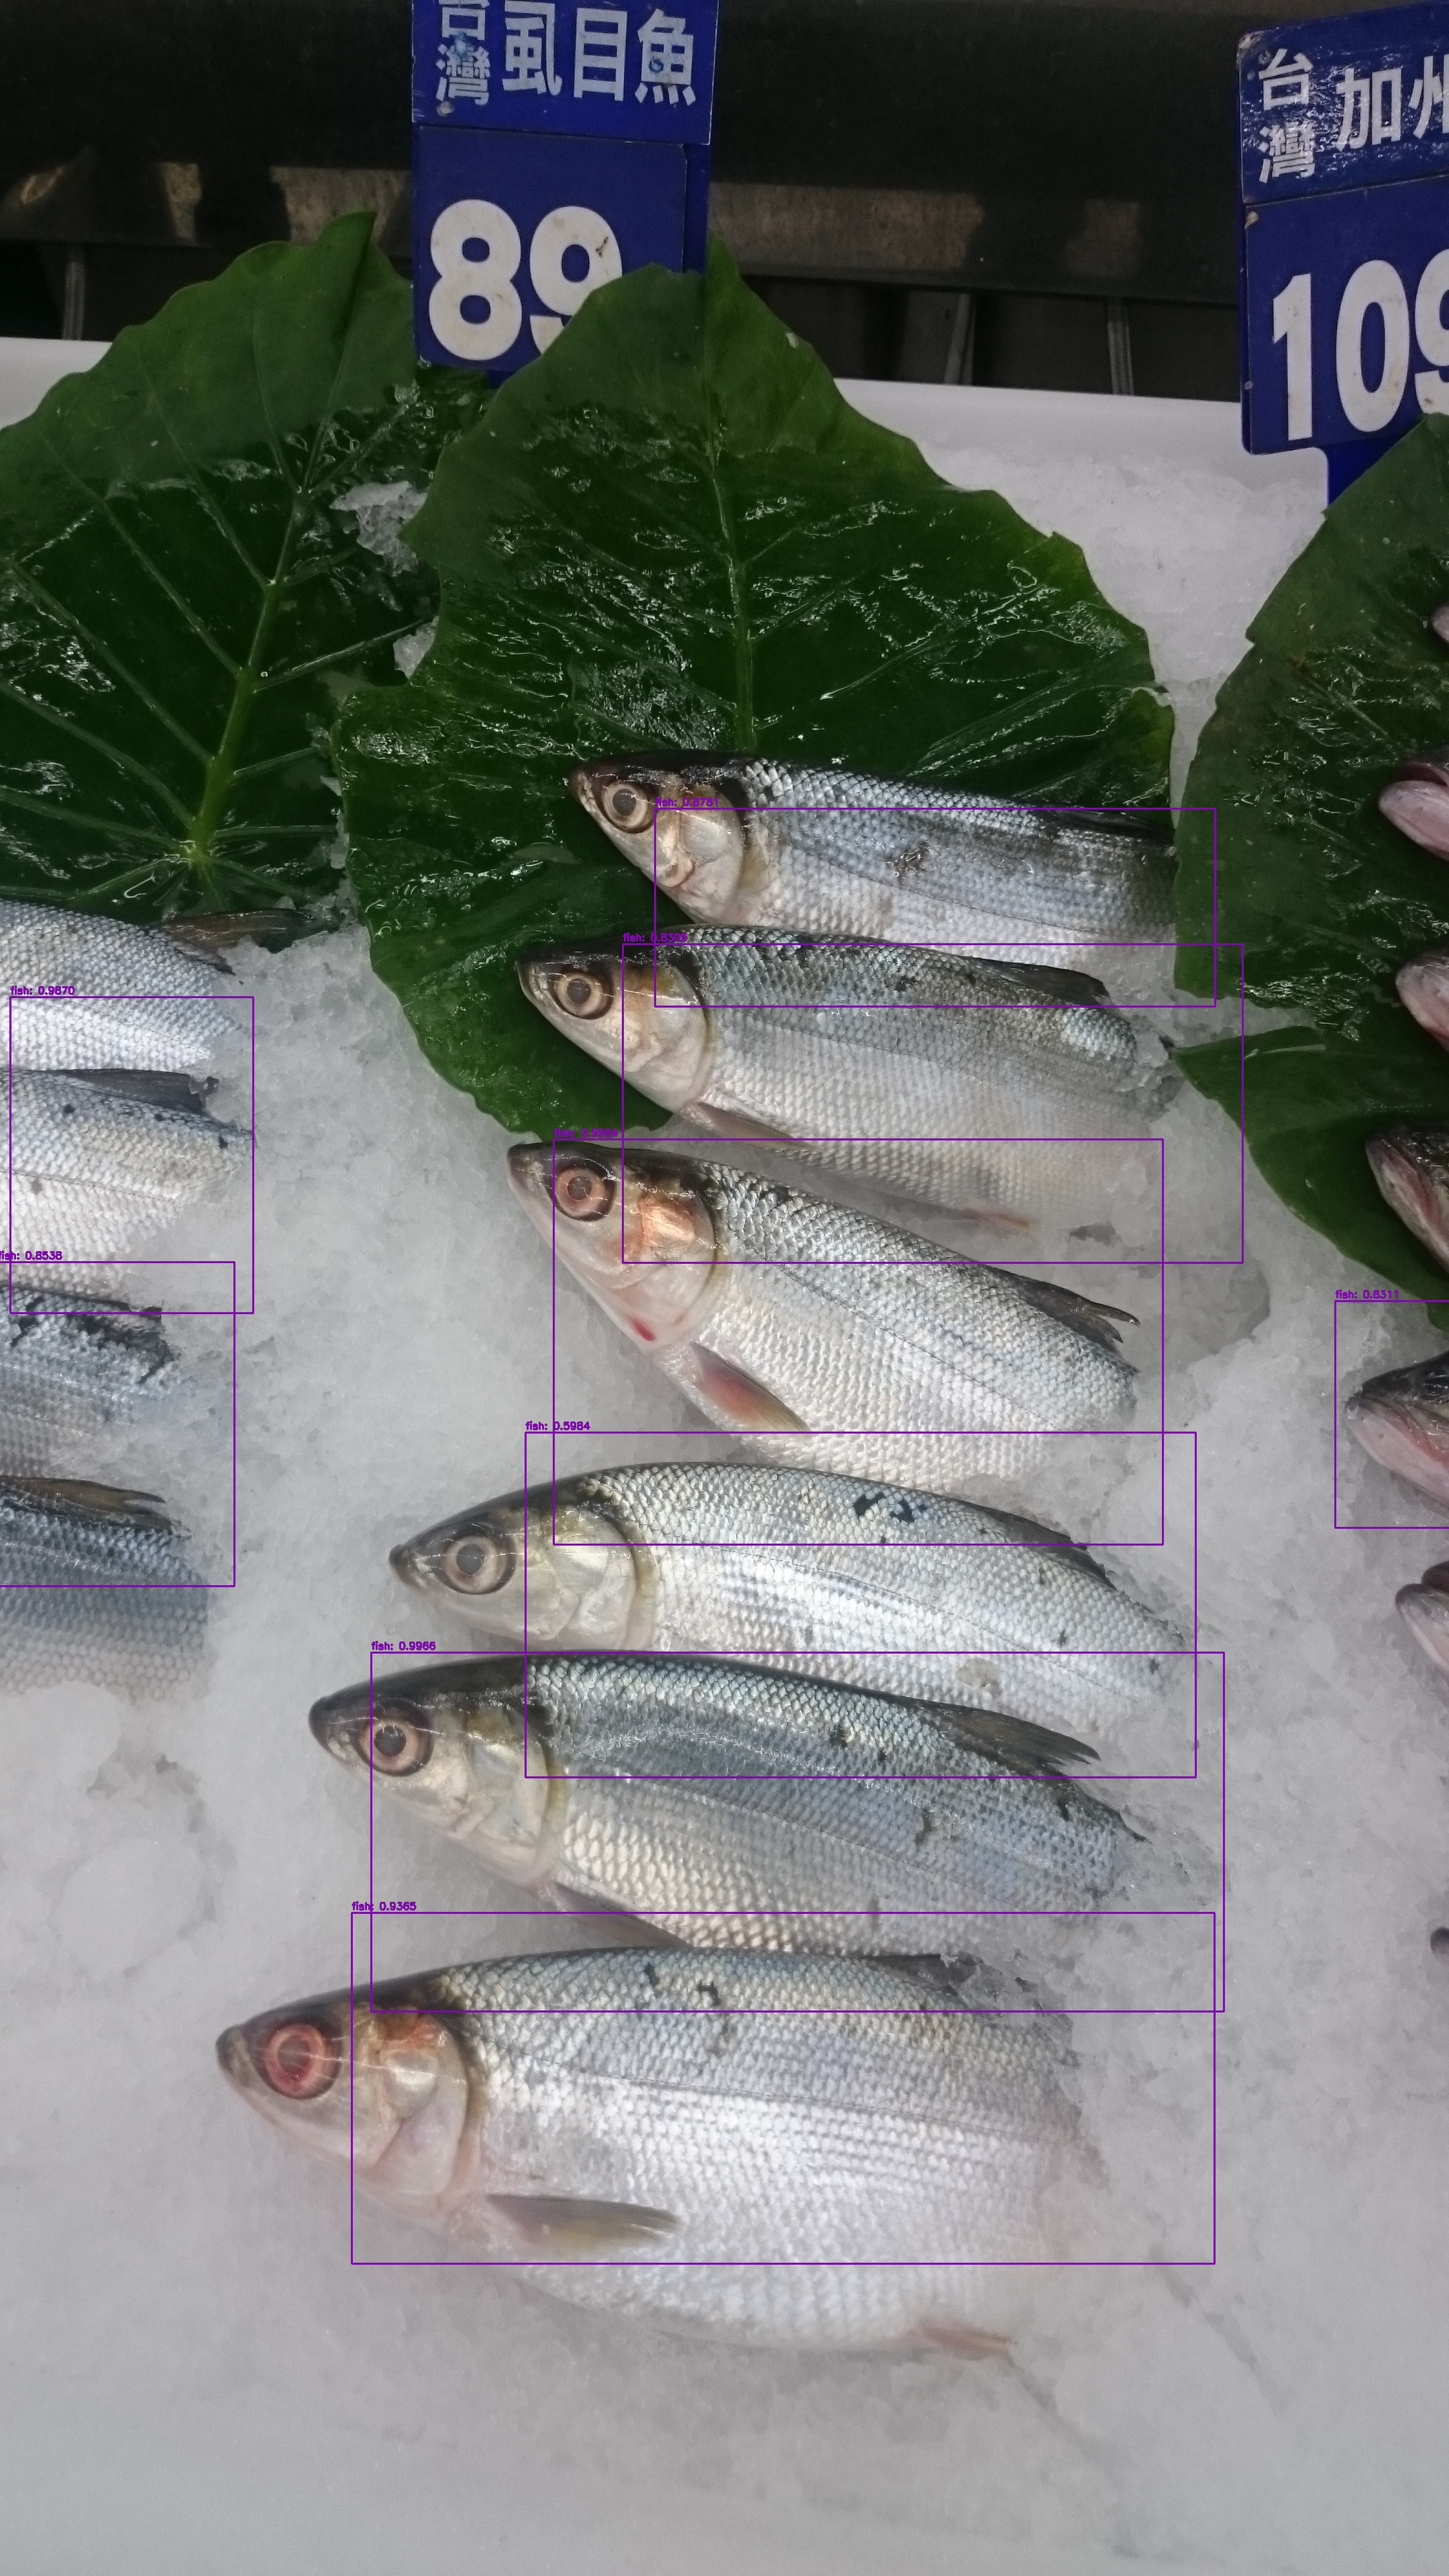
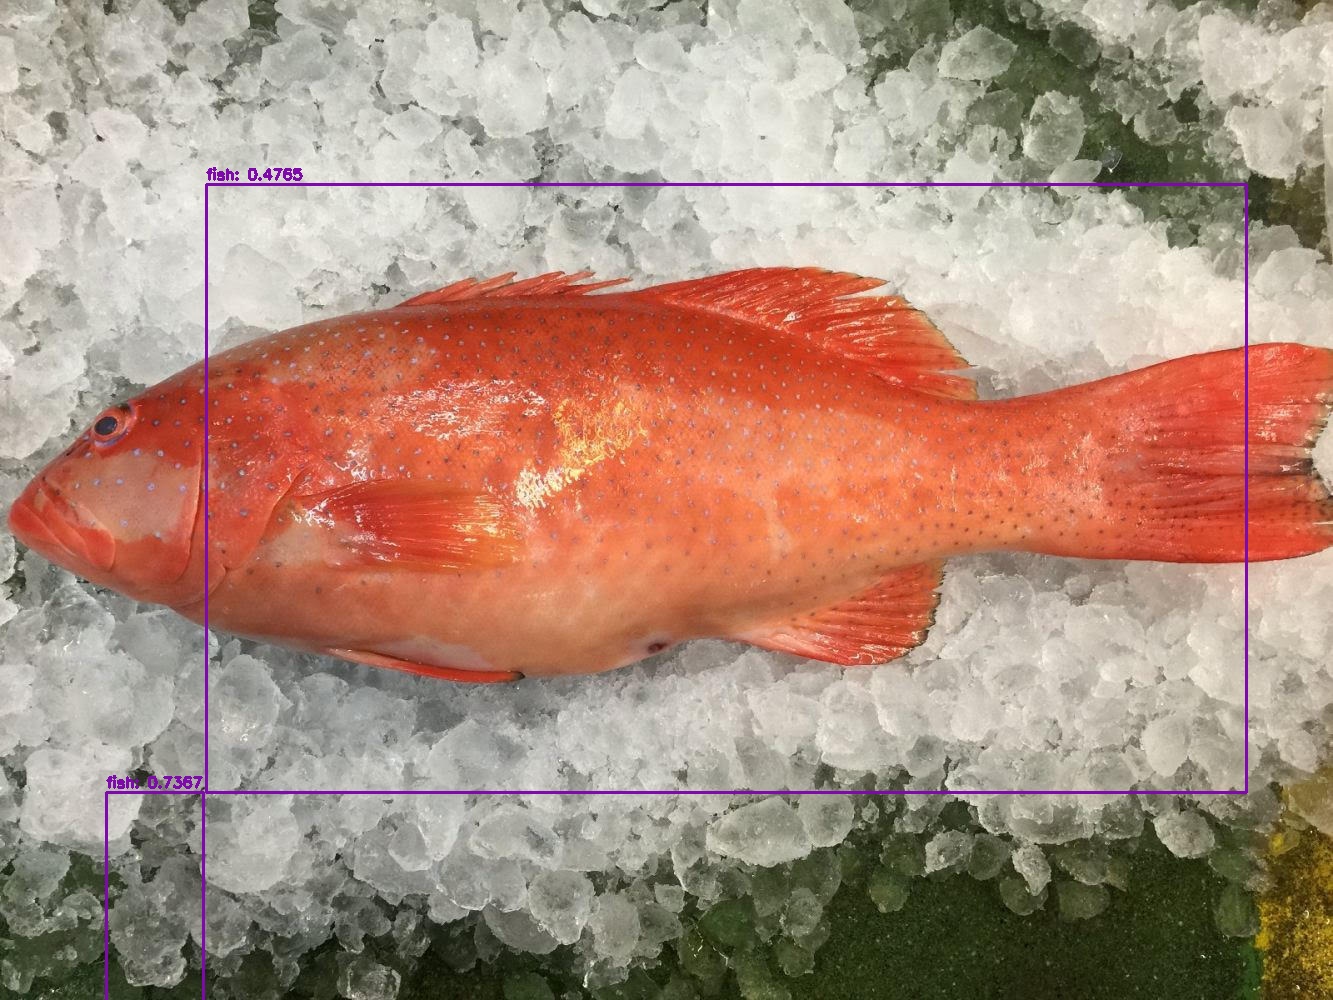
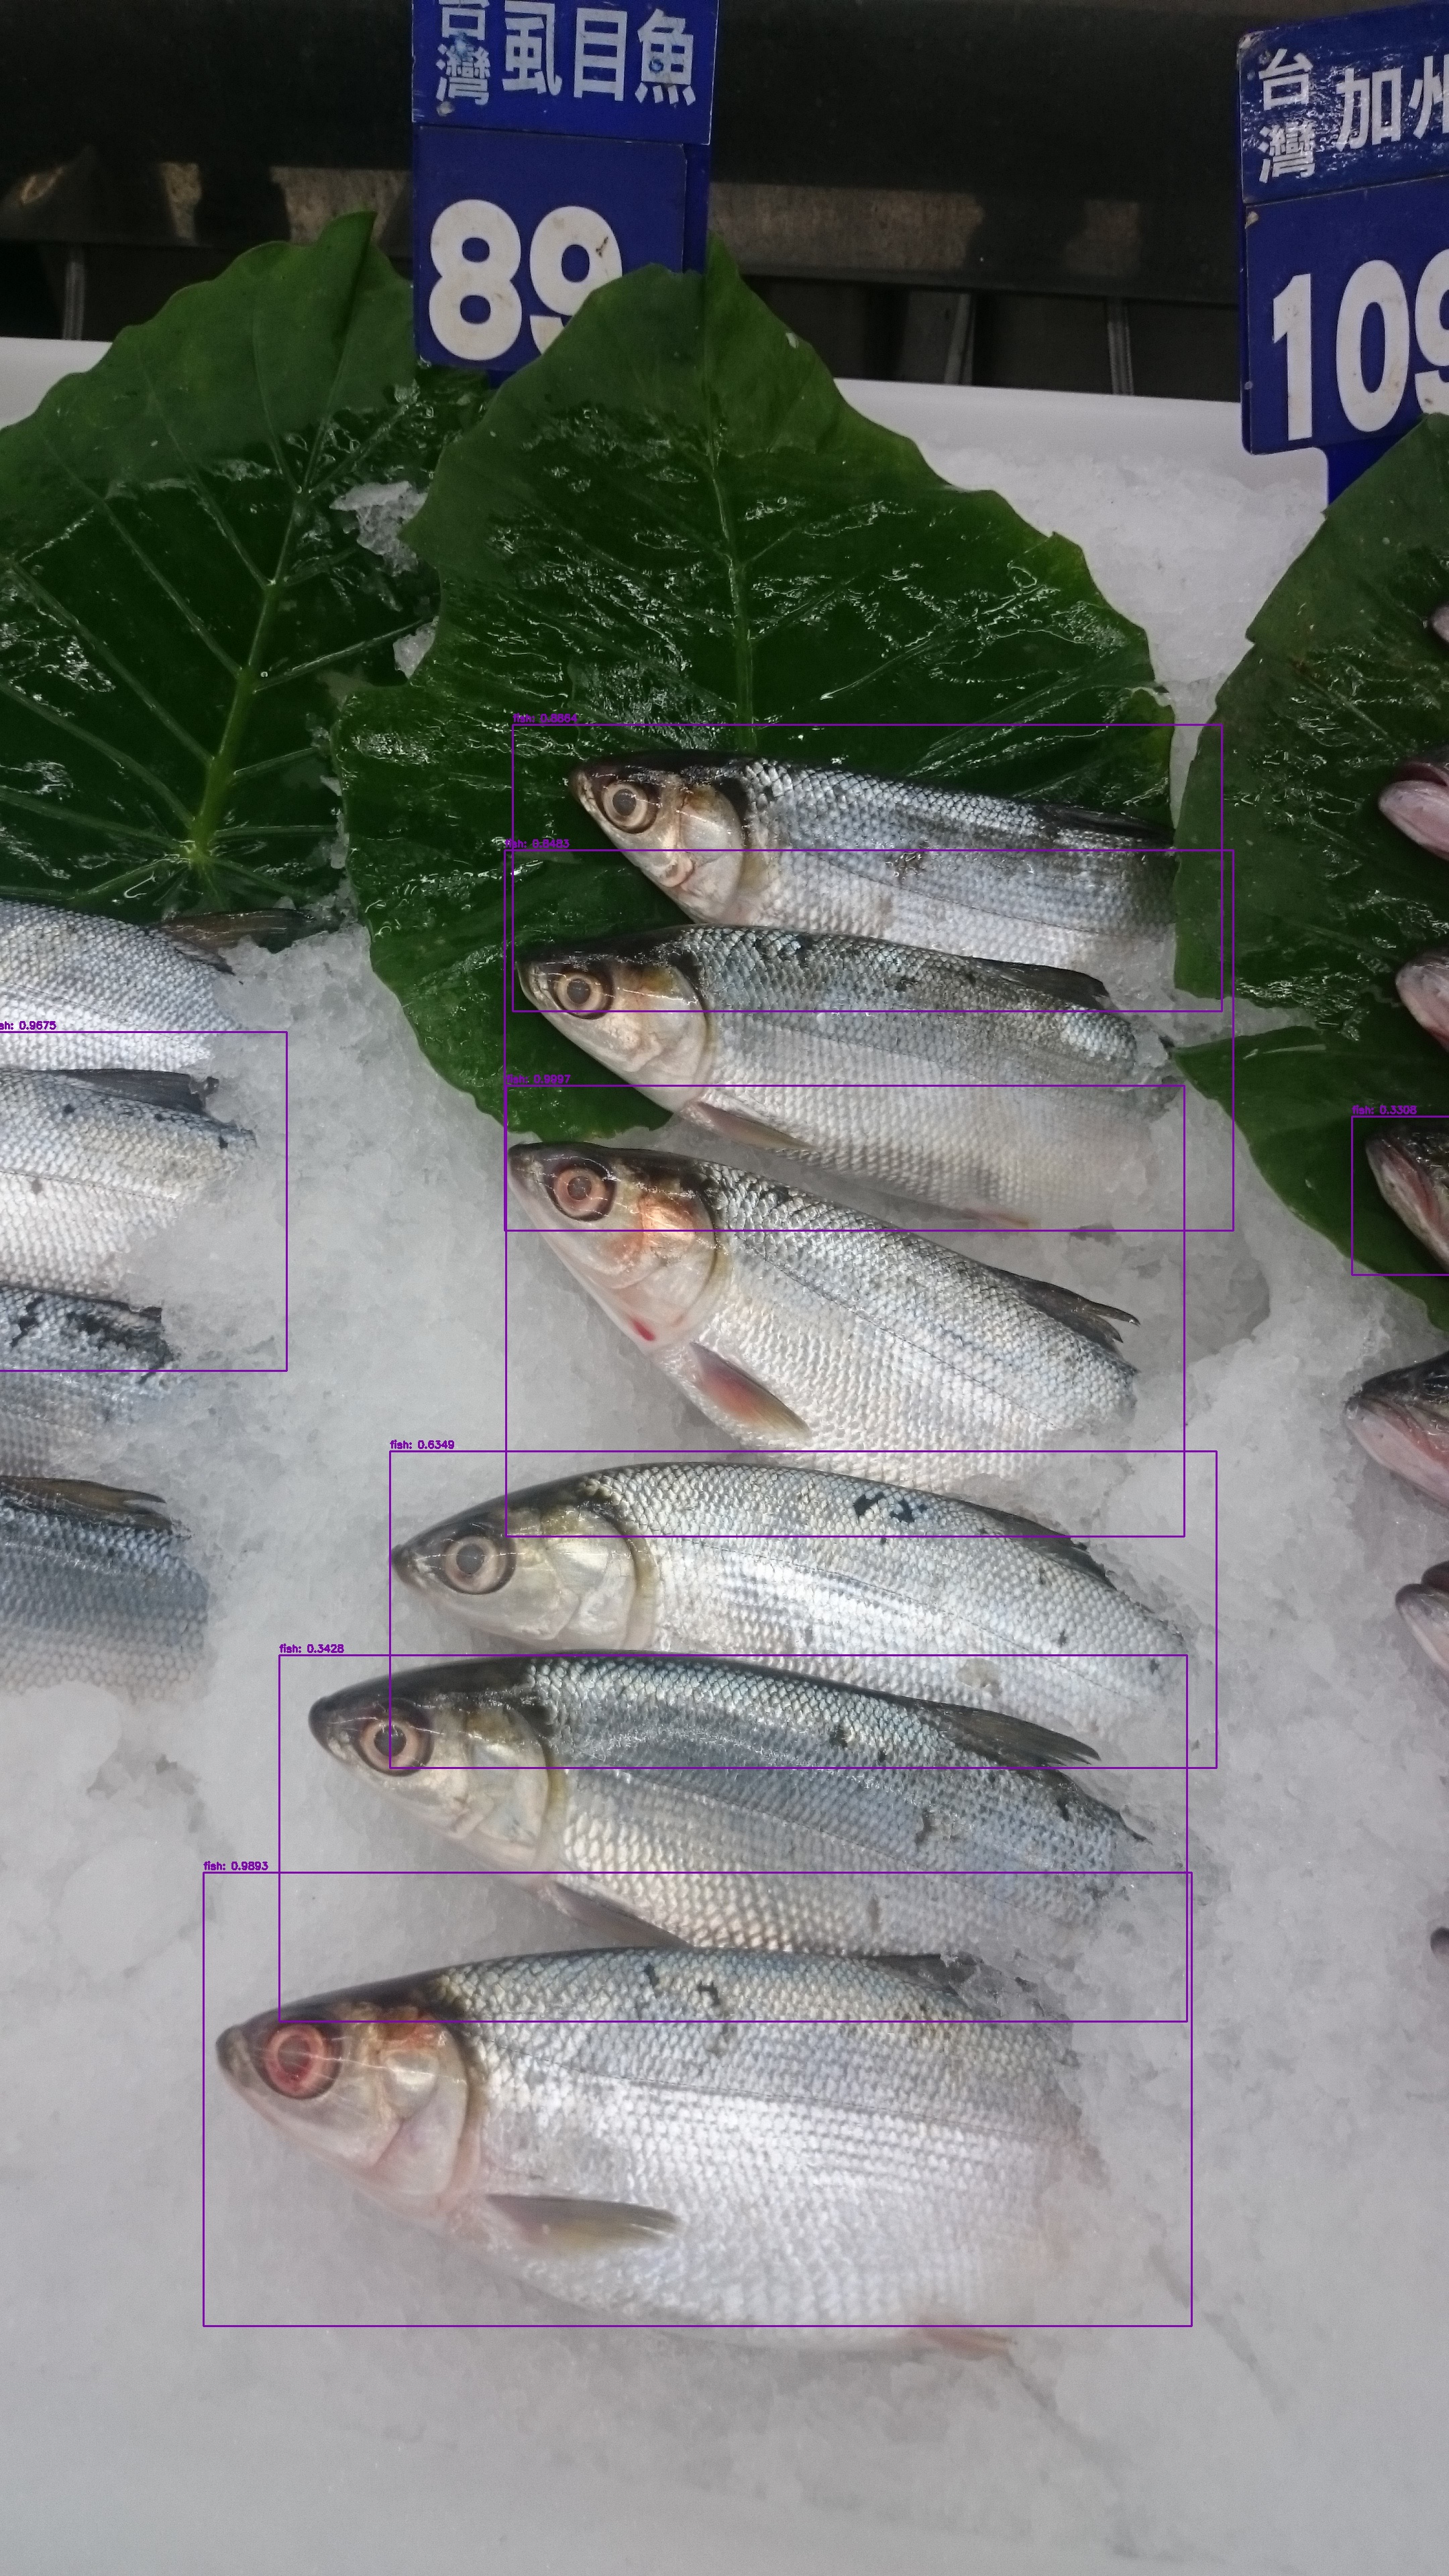
I found using 416x416 resolution as input will produce more desirable result compared to 608x608 resulution in OpenCV.
Taking DSC_0061.JPG and 七星斑.jpg as examples:
- Set resolution as 608x608
| DSC_0061.JPG | 七星斑.jpg |
|---|---|
 |
 |
- Set resolution as 416x416
| DSC_0061.JPG | 七星斑.jpg |
|---|---|
 |
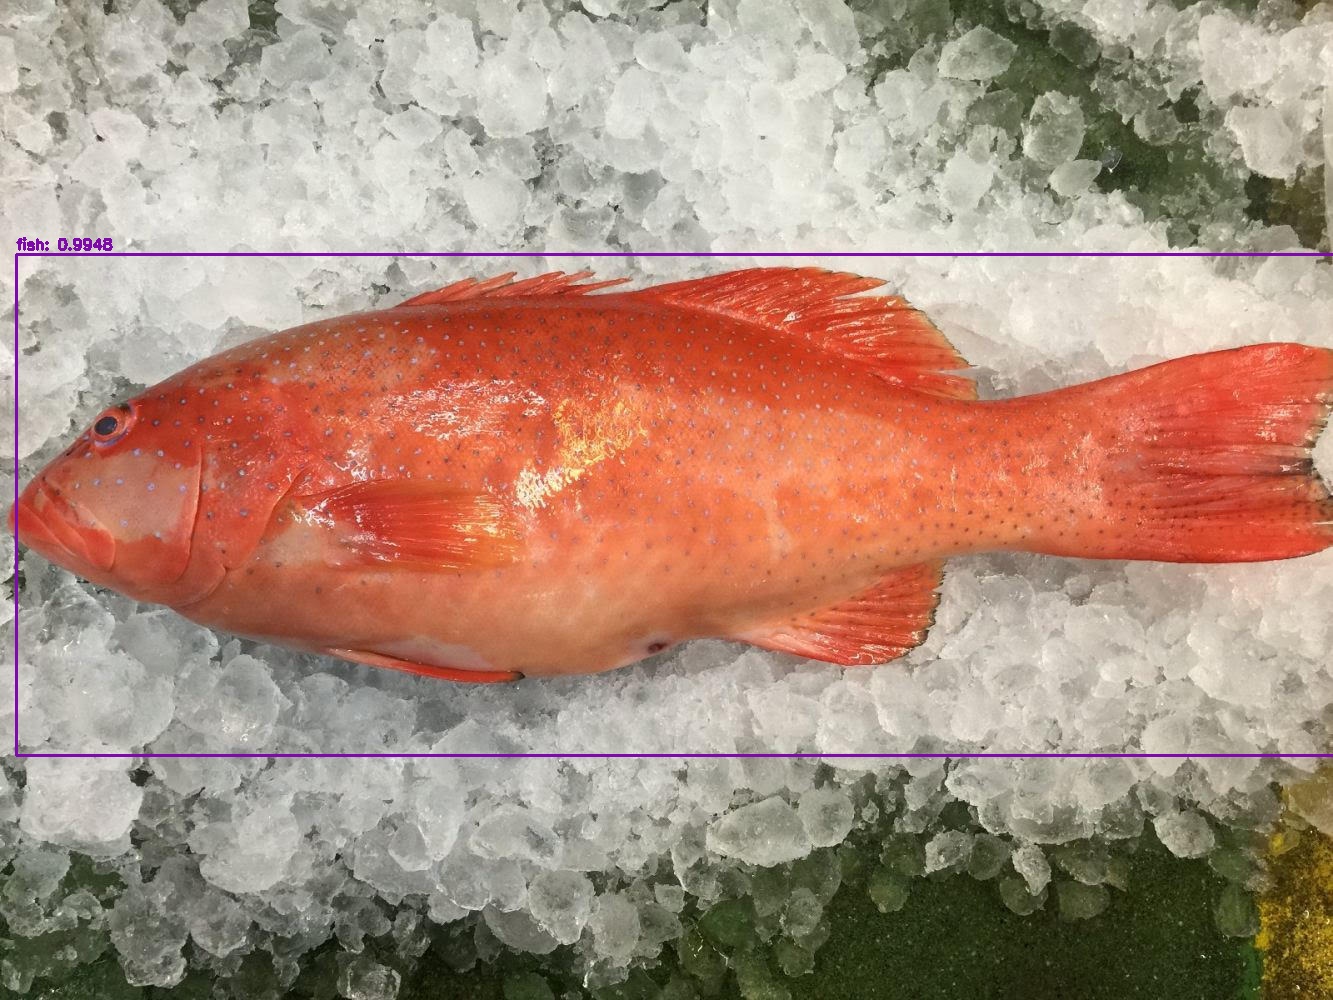 |
You can realize when setting resolution to 416x416 produces more desirable results (the bounding box localizes the fish more precisely).
Special Thanks
This article would not appear if pyimagesearch did not write an awesome article about teaching you how to use OpenCV for YOLO object detection. You can find his work on this article.