Implement SRCNN with Pure C++
Motivation
When I started to take my master degree, my professor told me to implement with pure C++ and CUDA. After working for two months, I eventually finished the first version but the result seems not only blurry but also wrong size.
However, I learned how to use pointer and basic CUDA concepts in this project. Also, I got some concepts of how a CNN work and its architecture. As a revenge, I want to implement SRCNN from scratch, and this post is talking about the note when working on this project.
What is Super Resolution?
Super resolution is an image processing technique that constructs an image with a higher resolution. So far, we use a lot of features to represent the properties of image for such application, and neural network is one way to extract features. With the help of neural network, we create a tempting result ever.
So What is SRCNN?
Convolutional Neural Network (CNN) is widely adopted on visual mission. As for super resolution, SRCNN is the first one using CNN to complete such task. Proposed by Chao Dong et al in 2014 [1], SRCNN outperforms plenty of methods including sparsed-coding.
What’s more, the composition of SRCNN is quite easy: 3 convolution and 2 activation layer. I was pretty amazed that such structure can beat traditional methods, though it comes up with two flaws:
- You have to resize the image to output size before pass the image to CNN.
- As the size of output image grows, it takes more time to produce result.
Overall Structure
The following image shows the structure of SRCNN and is taken from [1].
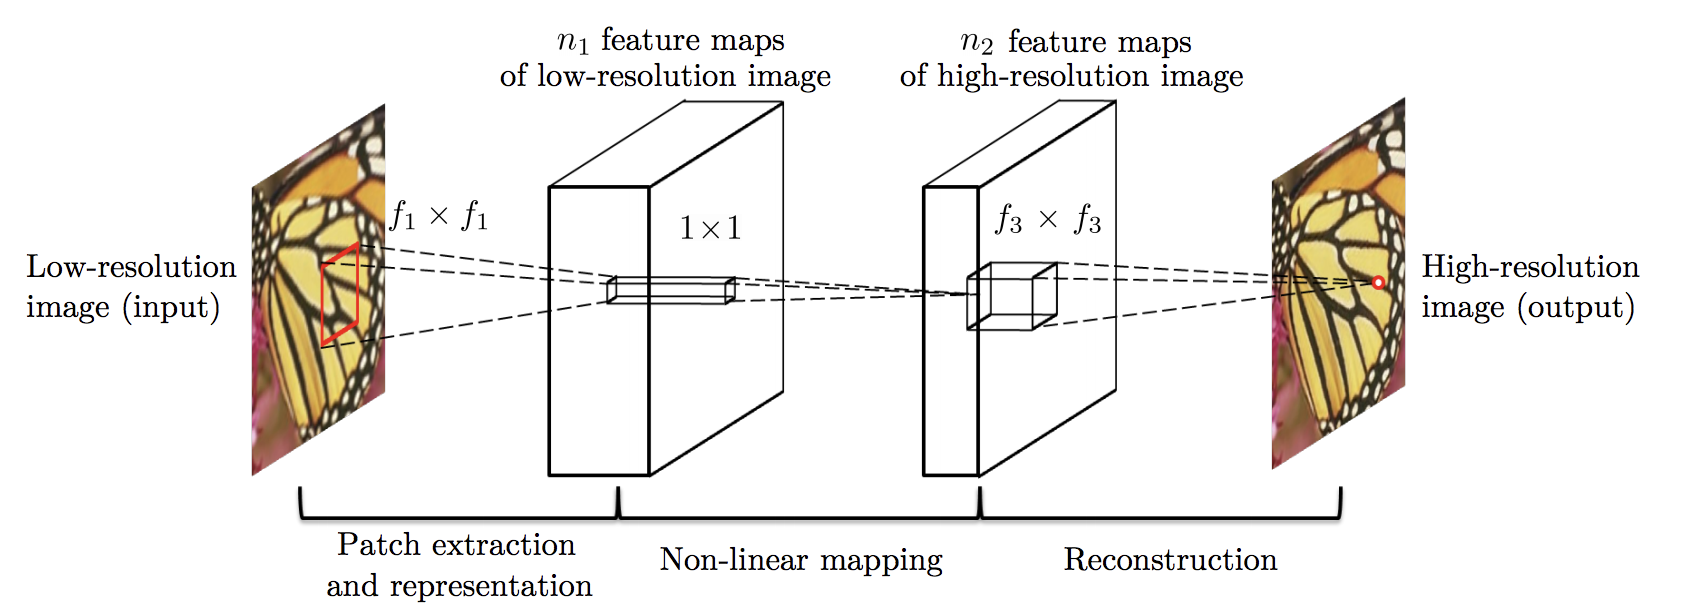
Suggested by the picture, what we have to do is to implement convolution and activation layer.
Implementation Details
This part I am going to show some details about my implementation.
Convolution Layer
Naive Method
It is simple to implement naive convolution: the value of each output neuron is the summation of input neuron times kernel parameters. The following pseudo-code helps you to realize this calculation:
for(k = 0; k < # of output channels; k += stride)
    for(n = 0; n < # of input channels; n += stride)
        for(i = 0; i < # of input height; i += stride)
            for(j = 0; j < # of input width; j += stride)
                sum = 0;
                for(l = 0; l < # of kernel height; l++)
                    for(m = 0; m < # of kernel width; m++)
                        sum += input[n][i][j] * kernel[k][n][l][m];
                output[k][i][j] += sum;
im2col Method
We see that we need 6 for-loop to do naive convolution in the previous section. What’s more, if the stride is sufficient large, we have to collect the values that are far together, hence lost the locality usage of cache.
Suggested by the author of Caffe, we can use im2col techinique to transform convolution calculation into matrix multiplication problem. In this case, we utilize the locality of computer architecture when performing multiplication. Besides, we can further use a highly-optimized BLAS (Basic Linear Algebra Subprograms) library to boost our convolution calculation.
The disadvantage of this method is that you need more memory in order to store the
matrix created by im2col function.
The following image show the concept of im2col and is taken from [2]:

Activation Layer
Compared to Convolution Layer, this layer is rather simple; you just pass the value of each neuron to activation function and get the result.
I choose ReLU as this kind of activation function is used in SRCNN.
Reading Weights
Though Caffe uses NCHW format, the author of SRCNN uses CHWN format to store their network weights [1]:
for i = 1 : channel
        for j = 1 : fnum
             temp = conv_filters(:,:,i,j);
             if channel == 1
                weights(:,j) = temp(:);
             else
                weights(i,:,j) = temp(:);
             end
        end
    end
For more information about weight format layout, you can visit this post of Intel-MKLDNN.
In my implementation, I apply NCHW format because most of the neural network framework adopt this type of format.
Code
Just the old saying goes, show me the code!
Yup, the code is here, and you can take a look
in src/srcnn.cpp. Yet I write it as a monster class (there are 1000+ lines in src/srcnn.cpp).
Therefore, I think I should create seperate files to store each component in the future.
Result
The results of my SRCNN implementation are shown in this table:
| naive | im2col |
|---|---|
 |
 |
Of course, we need some comparison to realize my implementation is right or not!
So here are the results of a format member of my lab and the implementation in my freshman year of master:
| former member | my freshman year |
|---|---|
 |
 |
You can see both implementation yields correct result compared to that implemented in my freshman year of master (both output size and image quality). Nevertheless, it seems the quality of my three implementations is not as good as the former member one.
Benckmark
The benchmark parameter is shown below:
- OS: macOS 10.13.4
- CPU: Intel Core-i7 7700 with one core
- Memory: 32 GB
- Compiler: Apple LLVM version 10.0.0
- Desired output size: 512 x 512 pixel
- Testing method: run program with one factor three time then get the average
- Time counting method: use
std::chrono
And here are the benchmarks of each SRCNN implementation method comparison:
- naive: (125.414 + 122.221 + 124.625) / 3 = 124.0867 s
- im2col: (323.543 + 339.007 + 316.313) / 3 = 326.2877 s
As you can see, though im2col method can gain a boost with sacrificing the memory, it is much slower than naive method. I guess is that preparing column matrix takes a lot of time.
Making Faster
Convolution is a kind of embrassing parallel problem; that is, it applies an operation on a lot of data. So we can use some parallel computing techniques to speed up the execution.
On CPU parallel scenario, we can choose OpenMP as a parallel computing target for its simplicity.
Here are the benchmarks after applying OpenMP of each SRCNN implementation comparison:
- naive: (37.6111 + 39.9825 + 38.3595) / 3 = 38.6510 s
- im2col: (97.9533 + 103.525 + 94.5232) / 3 = 98.6672 s
Well, both of techniques runs much faster, but im2col still runs much slower than naive one.
Conclusion
In this post, I make a brief introduction of super resolution and SRCNN. Then I demonstrate the structure of SRCNN, and talk about the implementation details of these layers. At last, I make a result and execution time comparisons between two types of implementation and give an assumption why the preferable implementation in most framework runs much slower than a naive one.
Special Thanks
I would like to give this special thanks to masc4ii for add OpenMP and QMake building option features. Without your help, this project will be far from completion.
Reference
[1] http://mmlab.ie.cuhk.edu.hk/projects/SRCNN.html
[2] https://leonardoaraujosantos.gitbooks.io/artificial-inteligence/content/making_faster.html