A Virtual YouTuber System without Deep Learning
In this article, I am going to present a Virtual YouTuber (VTuber) system just using ordinary CPU and webcam written in C++. I will also talk about the phenomenon of VTuber and some basics of gaze tracking. At last, I will leave some personal thoughts after working on this system.
Introduction of VTuber
VTuber means a person streaming or uploading to YouTube with an anime avatar follwing his movement in real-time. [^1] Though VTuber originated from mid-2010 in Japan, it started to boom from the beginning of 2020 with the help of COVID-19 and the push of some commercial companies such as hololive [^2] and nijisanji. [^3]
Motivation
One day, my friend sent me a project which he created a VTuber system written in Python. After glancing his code, I came up with an idea: what not implement this VTuber system in C++ for performance boosting as well as showing off my ability of C++? Furthermore, I want to strengthen my image processing knowledge by implementing this VTuber project.
Also, many of the VTuber system uses deep learning techniques or specialized hardware for pretty precise movement catch [^4], but not every one can afford the devices such as specialized hardware or GPU. What’s more, it requires more set up procedures or environment which may not be feasible in some scenes. In comparison, this VTuber system only needs normal CPU as well as webcam for the ease of setting up and cost efficiency.
Architecture
The architecture of this system is described as follows:
Server
The server is responsible for detecting user’s face and its landmarks. After detecting the landmarks, it will calculates the movement of eyes and mouth. Next, the movement data will be transmitted to client via WebSocket.
Client
The clent is responsible for display the VTuber as well as its movements. For real-time displaying purpose, client uses WebSocket for receiving the movement data. After client receives the data sent from server, it will display the VTyber and its movements in browser.
Processing Procedures of Gaze Tracking and Mouth Movement
I guess you would like to realize how server detects face and calculates the movement under-the-hood. So in this paragraph, I am going to tell the details from webcam to face movement stream data.
-
Capture the video stream from webcam to picture by picture.
-
Resize the input picture.
It is a common knowledge that resizing the image can boost the image processing speed as there are fewer of pixels. After testing, resizing the input image to half of width and height can have 2x speed up while not hugely affect the face detection and gaze tracking processes. -
Grayscale the input picture.
Again, you should grayscale your image if you do not need the color channels for further processing. What’s more, Dlib face detector runs faster in grayscale compared to RGB. -
Run face landmark detection via Dlib.
-
Detect the regions of eyes.
In this procedure, we are going to detect the eyes. To speed up the processing and for more accurate result. I crop the images only containing the eyes. -
Retrive pupil of each eye region.
As indicated in [^6], using a threshold betweend 5 to 100 then choose the last second one after sorting by pupil contour area can suit for most cases. Therfore, I adapt this Python package then re-written in C++ to suit my project. -
Calculate the face movement (gaze and mouth).
After get the face landmark and the pupil location, it’s time to calculate the face movement. The calculation is adapted from my friend’s VTuber project in [^7]. -
Stream the data through WebSocket to client.
System Set up
In this part, I will summarize the set up of this vface-server-cpp projct.
Server
-
Download the vface-server-cpp from here: https://github.com/Cuda-Chen/vface-server-cpp
- Install the dependencies, namely:
- OpenCV
- websocketd
- Compile the project by typing:
$ mkdir build && cd build && cmake .. && make - Execute the program by typing:
$ websocketd --port=5566 ./vface_server_cpp - Run the client (namely, vface-web [^8]).
Client
For client set up, as the repo is maintained by my friend, you can visit [^8] for setting up.
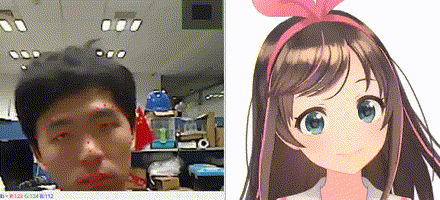
Result
Thanks to the common ways such as resizing, threshold, and region of interest (ROI) used in image processing, my VTuber system can detect and calculate the face keypoints in about 10 ms. After the calculation, the data will be transmitted to client then draw the animate character you choose.
The following image uses my face to create this adorable character:
As such, you can notice that the character cannot close her eyes entirely. The reason are that I sit too far away the webcam and the eye closing movement needs further adjustment for each individual.
Summary
In this post, I show you guys my VTuber system and introduce the background of VTuber. I also list the processing procedures from framing your face, detect and calculating the face keypoints. At last, I demonstrate the result and leave some marks for further improvements.
References
[^1] https://www.urbandictionary.com/define.php?term=VTuber
[^2] https://en.hololive.tv/
[^3] https://www.nijisanji.jp/
[^4] https://gist.github.com/emilianavt/cbf4d6de6f7fb01a42d4cce922795794
[^5] https://github.com/DeepVTuber/DeepVTB#head-pose-estimation
[^6] https://github.com/antoinelame/GazeTracking
[^7] https://github.com/c910335/vface-server/blob/master/calculator.py
[^8] https://github.com/c910335/vface-web